Saturday, July 25, 2009

Water Rocket Bottle Coupler Construction Tutorial

This week we will be presenting an article detailing how to build connectors to join together multiple bottles by the threaded necks. This type of bottle connector is generally used when making large volume or extended length water rockets like some of the rockets you may have seen on the TDFwaterrockets blog.

The connectors we will be building today are an advantage in this type of rocket because they allow for a modular approach to be applied to your rocket design, which simplifies construction and repair of a damaged rocket. There are commercial products that one can purchase called "tornado tubes" which some water rockets are constructed from, but these are not designed for significant pressure and cost more when compared to building them yourself. Doing things yourself is a lot more satisfying, and is a great lesson for children in managing money by doing for themselves rather than buying something overpriced off the shelf.
Getting back to the advantages of a modular rocket, construction effort is reduced because a module rocket can be built to sections screwed together with these connectors as opposed to one contiguous rocket made from multiple spliced bottle sections which all have to be perfect. In a module design, each module can be built and tested individually and if one happens to be defective you have not wasted the entire rocket because you simply replace the faulty module. This holds true if the rocket ever becomes stressed or damaged as well, where bad modules are replaced instead of scrapping the entire rocket for one leak.

The downside of a module rocket is that the modular sections and the connections between them add extra weight and are less aerodynamic than a standard spliced rocket, so they are great for experiments, but not really appropriate for setting any type of record. But for the casual water rocket enthusiast, these make life so much easier that we are devoting this update to showing how to build your own bottle couplers.

Let's begin the tutorial, shall we?

The first thing you will need is a tube of the "Low Surface Energy" glue we featured in our June 6, 2009 Update. If you want to learn more about this amazing new glue we discovered, please go back and check the update. We are finding quite a few uses for this glue and we think you will too!
You will also need to collect up some extra bottle caps. They come in all sorts of colors, so be creative and pick colors you think will look good on your rocket. Be sure to find caps that come from carbonated soft drinks and not those from water or juice bottles. The carbonated bottle caps have a built-in seal made of a soft rubbery material that will allow the construction of this coupler design without needing o-rings, which is a cost savings for you!
The  last ingredient in our recipe is a short piece of T-8 Fluorescent Tube Cover (FTC). Be sure and get T-8 tubes and not T-12 tubes, because the narrower T-8 tube fits snugly over the bottle caps. it almost looks as if whoever designed the T-8 tube had water rockets in mind when they picked the diameter! This is a lucky coincidence!
These parts, with a little effort and some simple hand tools are all you need to create these modular rocket couplers.

The first step in construction is quite simple. We need to use some sandpaper to roughen up the surface of our bottle caps to increase the bonding strength of the glue joints. Be sure to roughen up the entire outside surface of your bottle caps, including the sides. You will also want to scuff up the inside of your T-8 FTC a bit as we will be gluing the inside of the FTC as well.
Here are some of our sanded and un-sanded bottle caps side by side, so you can see how nice and rough they are. Before you go any further you should wash the caps in a strong detergent to make sure any soda and oils from your fingers are removed. You can also wipe them down with alcohol after you wash them to remove any other residue that the detergent couldn't remove such are sticky glues from labels or price stickers.
The glue we are using is specifically designed to work on Polypropylene and Polyethylene plastic, which is the type of plastic which the bottle caps are made from. If you refer back to our initial report on this glue, you will see how to identify these kinds of plastics. The glue we discovered is a two part glue which consists of a primer activator and a CA glue that is applied after the primer has evaporated. We used the Loctite brand glue for our tutorial here because the primer comes in a felt-tip pen applicator, which can be closed and reused multiple times.

The super-glue brand adhesive come with 2 vials of primer activator and these cannot be closed once opened, plus the adhesive part comes in a gel form which is great for some applications but we did not think it would flow as well as the less viscous loctite brand, so we did not use the gel.
The next step is to cut a piece of T-8 FTC that is twice as long as a cap is tall. A simple way to do this is to stuff a pair of caps inside the tube together and trim off the overhanging ends of the FTC tube and then push the caps out of the resulting cylinder of tube.
After the primer has fully evaporated, we apply the CA adhesive to one of our caps, coating the sides and top of the cap with a thin layer of adhesive. We then slide the cut section of FTC over the cap and push the cap all the way flush with the end of the FTC. Make sure the threaded side of the cap is facing outwards before the glue starts to set because you will have a few seconds to correct the mistake and that's not very long. The other cap is quickly coated with glue and slid in the opposite end of the FTC with the threads facing the opposite direction. Quickly clamp or press the caps tightly together and leave the glue to cure to full strength.
Here we have pushed one cap in the FTC already and the other one is ready to go in. We discovered that screwing a cap onto a scrap bottle before applying the glue to the outside allows the bottle to act as a "handle" so you can pick up the caps and push them in without touching the glue or getting it on your fingers or tools. Feel free to use this method as it will save you a ot of headaches.
Once the glue is cured, you will take a drill or a hole saw and cut a hole through the center of the bottle caps to allow air to pass through the connector. We used a hole saw for our holes because the center drill in the saw was very easy to center on the end of the bottle caps and get a perfectly centered hole through the middle without wandering off center. Since we use the built-in seal on the bottle caps in place of an o-ring, we wanted to be sure our holes were centered.
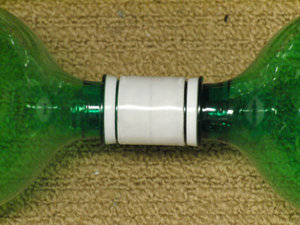
We noticed that the cured glue turns a whitish color which doesn't look spectacular cosmetically, except on the couplers we made using white bottle caps, which turned out fantastic looking. It's not a big deal and in any case the FTC can be painted to any color you want if you wish.
Notice how nicely the plain white couplers turned out.
The final weight of our couplers were measured at 6.2 grams, which is really quite good.
We waited 48 hours for the plastic glue to fully cure and then decided to give the couplers a good pressure test, just to make sure that they would hold up. We built a little test rig to pressurize a pair of bottles coupled with one of our custom built bottle couplers. The rig consisted of a spliced bottle with two female ends and a cap with a schraeder valve on one end. The opposite end connected to a second bottle with one of our couplers and the whole system was filled with water as a safety precaution before pressure testing.

By filling the setup with water, there is little air space inside the test rig and if something fails there will be less energy contained inside to cause harm in the event of a failure. Only compressed air inside the rig can store energy, so the incompressible water will take up room and reduce the available kinetic energy storage space, making the test much safer.

We pressurized the rig to 130PSI and left it there for 30 minutes. No water leaked out of the coupler and the pressure remained at 130 the entire time, so we concluded that the couplers passed the test with flying colors.
We decided to test a coupler to find it's failure point so we ramped up the pressure to find the point at which the coupler breaks but the test rig exploded at 145PSI before the coupler failed. We concluded that the couplers would be much stronger than any bottles we could splice, so we were pleased with these results.
That is all the time we have this week. Thanks for joining us, and we will be back next week with another update. We have quite a few new developments to report on so check with us next time for more surprises!

See you next week!


Saturday, July 18, 2009

Water Rocket Launcher Construction Tutorial Part 12

This week we have been very busy going over our experimental data which we were fortunate enough to obtain during the recent period of favorable launch winds. As a result of the data analysis we have concluded that we need to redesign the tail section of the rocket we are constructing for Project 3000. This is a minor setback, but the results should be worth the extra effort. We are planning a series detailing the experiments and the results which we will share with you in the coming weeks. First, we have to get back to our nearly finished tutorial on the launcher construction we had left hanging a few weeks ago.

This week we are starting to show some of the ideas we have come up with that you can apply to your launcher or your rockets to make them stand out from the crowd. These ideas are really just the finishing touches that we came up with when we were inspired by the finely crafted water rocket and launcher designs we have seen posted on the Water Rocket Forum by some of the members such as Batkiter and Skuula.

To begin with, we want to present you with a really interesting little detail that has not been given any attention and that is the cable ties. We have discovered that there are some really funky looking brightly colored cable ties on the market now, and they can really dress up your launcher if you would like to add them in place of the standard ties.
This particular package contains a rainbow assortment of day-glo colored cable ties and those would be a fun addition to any water rocket launcher you are making. The kids really go for the brightly colored launchers and so if you are looking to make something that will be appealing to children then these ties would be a great addition to your design.

Note: this particular style of cable ties is not listed as suitable for outdoor use so bear in mind that they are not UV resistant. If your launcher is made from PVC pipe then you already are aware that the pipe itself is not UV resistant, so you should not be storing it outside where it can be exposed to the sunlight for prolonged periods of time. UV light will eventually cause the PVC pipe and the cable ties to become brittle. A failure of the cable ties would likely result in a harmless self-launch of the rocket but a failure of the pipe could produce an injury. Always be careful with your launcher and check it frequently for signs of wear or damage to prevent accidents.

Most of you are never going to store your launcher outside in any case, because you are going to be so proud of the way it turns out you will proudly display it in your trophy cabinet inside your house (just kidding!)
If you are building your launcher out of CPVC or metal parts, then it can be stored in direct sunlight because these materials are designed for outdoor use. In that case, you will want to find cable ties which are rated for exterior use, such as the ones we originally made our launcher from. Typically, you will find that the ties which are black in color have UV protection, so if you are having trouble locating UV protected ties, look for black ones which should narrow your search.

Our next idea we would like to present is finishing the base of your launcher off with some nice paint. Of course we don't mean to just go out and slap a coat of house paint on like you would a patio chair or deck. We suggest you treat the launcher as you would a finely crafted model, and give it the appropriate attention to detail that will make it really professional looking.
By now we have told you to sand the base smooth enough times that you have a really nice smooth finish on the wood. If you do not, you will need ti sand it right now before you go on! The reason we want the base sanded is because we are about to apply a wonderful product we have been using on our nosecones called "Aero Gloss". This is a sealer for wood which will give it a really nice smooth hard finish and help prevent the grain of the wood from showing. We highly recommend using this product on wooden parts of your rocket, especially balsa wood parts. It will prevent them from absorbing moisture and gaining weight in the process. If the air is humid you will want to dry your parts in an oven before sealing them, just to insure they are as light as possible. For parts that do not fly on the rocket you don't have to worry about dryness.
What you will be doing now is painting a nice coat of the sealer on the wood. Pay close attention to the ends where the end grain of the wood is exposed, as this is the most absorbent part of the wood  and needs extra sealer to fill it in.

You should allow the sealer time to dry according to the directions and once it has dried completely you will sand the surfaces with very find sandpaper and reapply the sealer again for a second coat. If you have some tack cloth you can wipe down the surface after sanding to make sure no dust or fibers are left before you apply the sealer for each coat.

We plan on applying several coats of sealer to our launcher base, which is going to take several days time to cure and sand. We will have to leave with this much progress for the week and hopefully we will have time to complete the base for next week's update.

Thanks for stopping by. We will see you next time!

Saturday, July 11, 2009

Progress made and more freaky weather delays

Hello again everyone! We have been having some very bizarre weather this year and we've got another freak storm to tell you all about. There has been an unusually high amount of thunderstorm activity in our area for the past couple of weeks and this culminated in a very strange storm the likes of which we have never seen in our area than anyone on our team could recall.

The crazy weather has kept us really busy and we were unable to get online last week with our usual update. We are getting caught up and things should be back to normal quickly.
It all began last week we were minding our own business building and testing our rockets and we were actually trying to take advantage of the weather pattern because the conditions that cause thunderstorms tend to produce very favorable launch conditions in the hours before storms form. This can lead to spectacular cloudy vistas and scenic panoramas from the rocket. The conditions were perfect for test launches and we had conducted several experiments in the days before the freak storm hit.

We are happy to report that we have narrowed down the problems we have been having with rocket spin to an issue with our fins. We have not exactly confirmed the cause of the problem but we were able to change the design of our fins and correct the spinning to a very acceptable level.

Our success was interrupted by a freak series of storms that rolled on through over the course of several days and caused a lot of problems for local property owners and members of our team. The conditions must have been very unusual in the upper atmosphere, causing marble sized hailstones to form high in the sky. Hail of this size is very rare in this area, where we typically see hail the size of a pea if we see any at all. You can see the size of the hail as compared to a U.S. Quarter coin in the image below. However, the size of the hail was not the only strange thing...
In addition to the unusual size of these hailstones is the amount of them! Look at the image below to see just hod dense the accumulation of hail had gotten. This amount of hail is really unusual and it caused a lot of damage to the trees in the area which were sprouting new growth for the year. The pummeling of hailstones really devastated a good portion of the new growth and brought down a lot of the leaves and needles on the trees. A lot of small branches came down along with the leaves, so there was a lot of cleanup work to be done.
Along with the hail storms also came severe lightning as well. The home belonging to one of our team members was struck by lightning and the discharge destroyed some of the lighting fixtures and appliances. With all the cleanup work and repair work going on so that we could celebrate our annual the 4th of July Holiday party, we got a little behind schedule on our update.
Now that things are all cleaned up, we have resumed our testing activities. This past week we were able to test a new idea to provide a new camera "view" from the rocket that nobody has ever obtained before. Unfortunately, the new idea malfunctioned on the first test and needs a few tweaks before we are ready to go live with it. With the weather pattern the way it has been, we have been very lucky to have made a lot of test launches for fun new ideas like that.

We are currently also working on an idea to help stabilize the rocket when it descends on the parachute as well as when it goes up. This should help make our videos sharper and remove the blurring induced by the spinning and swinging motion of the rocket on the parachute.  We will be bringing an update in the future showing our progress with these experiments. We are taking advantage of the weather and have not had much time to document the breakthroughs.
That's all for now. The unusually good launch weather is forecast to continue for a while yet, so we are getting in several launches each launch day and this has really advanced our progress well ahead of where we planned to be at this time. It has afforded us the chance to run some additional experiments and we have learned some great things about our current fin design. When the winds pick back up we should have the time to compose a complete report.

We're glad to be back! See you next week!

Wednesday, July 1, 2009

Some cool Water Rocket Videos


This is a video we shot a while back that went 2,068 feet in altitude (630M) as part of our last published world record flights.